
Leaderboard


Popular Content
Showing content with the highest reputation since 04/17/2014 in all areas
-

From the album: Furniture 1
9 points -

From the album: Metalwork
This is one of Bill Hudson's Baby carriages from the late 1980's, fully sprung, folding leather top, etc© Wm. R. Robertson photo
9 points -

From the album: Furniture 2
© Wm. R. Robertson photo
8 points -

From the album: Structures & Rooms
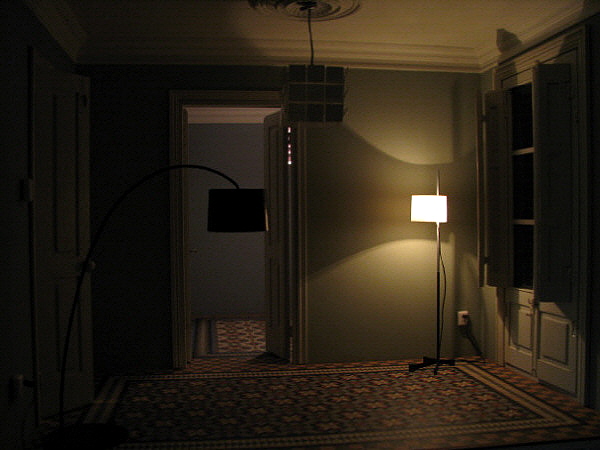
Moderators note….. I think is one of the most realistically lit miniature photographs I have ever seen.8 points -

From the album: Accessory & Other Objects
This 2" long chest is fully jointed with dovetailed drawers, working lock and trade label printed on period paper. The tools are all functional, the rule folds, the saw has 160 teeth to the inch, the dividers and calipers have friction hinges. This took nearly 1000 hours to make in the late 1990's.8 points -

From the album: Furniture 2
Made of steamed pear wood. Marquetry with several types of veneer. Pillow is petit point on 72 count silk gauze.7 points -

From the album: Needlepoint
Annelle taught this beautiful piece at Guild School in 2012. The frame was made by Dick Hardy and the brass candle sconces by Wm R Robertson.© Annelle Ferguson
7 points -

From the album: Metalwork
© Wm. R. Robertson photo
7 points -

From the album: Furniture upholstered with needlepoint
I think Annelle's petit point really compliments the William and Mary cabinet made by Bob Hurd so well.© Annelle Ferguson
6 points -
Hello to everybody, I have open this new topic in order to talk about the importance of light in our miniature houses and structures. I'm not going to talk about sophisticated setups which try to reproduce optical illusions in our scenes. This is quite common in dioramas and the techniques that we use are closer to theatrical scenery rather than architecture. What I want to show you is how we can change a room only playing with light as if it was a real one, that is, with natural light that goes through a window and artifical light of our lamps. I use modern lights. the modern light's designer is not only worried about the shape of the lamp, or the materials he use, but also for the kind of light he want to show: direct, indirect, diffuse, intense, its colour, warmer or colder light, and this give us many possibilities. I have boxed the room that will serve to explain what I mean. the first photo shows the room lighted by the sunlight that goes through the window. the second one, the same sunlight but filtering through the blinds the next one is dark and the light enters through another room the fourth is lighted by a "cubrik" lamp (Antoni Arola in 2005, for Santa e Cole) the fifth, by a "twiggy" ( Marc Sadler in 2006 for Foscarini) the sixth, "TMC", a very famous design made by Miguel Milà in 1961 the seventh, both "twiggy" and "TMC" finally all lights togethe http://www.artmajeur.com/miniarquitect


 5 points
 -

From the album: Dolls, Figures & Animals
Lamb Toy 1 1/2 inch tall. The coat was made by stitching French knots on Solvy. Once the Solvy was rinsed away, the stitched knots were applied in 1/2 inch to 1/4 patches to the lamb sculpt.5 points -

From the album: Needlepoint
Also known among the miniature stitchers as Aunt Olga's carpet Stitched on silk gauze #40 with one thread of variagated hand dyed cotton The Gentle Art Size : 20,7 x 27,5cm (8" 1/4 x 11") 331 x 441 stitches The original carpet is on exhibit...in my summer house ! (inherited from my reknown russian aunt Olga)5 points -

From the album: Furniture 2
5 points -

From the album: Accessory & Other Objects
The standing desk is copied from King Frederik VI's of Denmark on display at Rosenborg Castle, circa 1810.5 points -

From the album: Accessory & Other Objects
18th C. French Ladies Spinning Wheel in 1/6th & 1/12th scales with original in background. Made of wood, gold, brass, steel velvet and vespel.© Wm. R. Robertson
5 points -

From the album: Accessory & Other Objects
Miniature English style Miter and Chariot planes with brass sides dovetailed to steel soles. Hard steel blades and rosewood infill. These can be set to take as little as a half of thousandth of and inch off per cut. Made by Wm. R. Robertson© Wm. R. Robertson
5 points -

From the album: Structures & Rooms
The hall and stairway of Twin Manors, one of a pair of 1/12th scale miniature houses© Wm. R. Robertson
5 points -

From the album: Accessory & Other Objects
Made from Mopane & Swiss pear wood5 points -
I am venturing on a new project. Simmy from UK, former member of the late Scale Model Horse Drawn Vehicles forum, sent me a CD with tuns of photos of two different Chinese carts. He built one in 1/8th scale. I found them intriguing and decided to see if I can build one. I will be building in 1/12th. I thought that this would be an easy project, now I could build with my trembling hands. While I now have my doubts I am continuing on. I will post the build as I go.
 4 points
 -
Hello everyone. Was overseas for a year. I had no ability to stay in touch with emails and barely had access to the internet. Anyhow, I did have time to build a 1:16 scale log cabin. It is constructed in the same manner as a full scale cabin would be. Half-dovetail notches on the logs and chinking troweled on between them. I enjoyed most of the processes except applying and ageing the shingles. About 2000 of them. My next project will be something which has no shingles! The pictures are of the cabin pasted over some background image. Cheers, Guy


 4 points
 -

From the album: Dolls, Figures & Animals
The Lab is carved of wood and furred. Some details are of other materials. The eyes are acrylic and the tongue is leather, for instance.4 points -

From the album: Textiles
Designed and stitched by Teresa Layman. This was one of my IGMA Fellow submission pieces. The design was inspired from the end papers of a children's book called, "The Lady and the Lion" by Laurel Long. The piece has approximately 2000 French knots per square inch and took about 800 hours from start to finish.© 2014 Teresa Layman
4 points -

From the album: Metalwork
This Jens Torp enamel and 18K gold urn is based on a design by Fabergé. It can be seen inside Spencer House, the Spencer family’s ancestral home in miniature in the KSB Miniatures Collection.© KSB Miniatures Collection
4 points -

From the album: Accessory & Other Objects
A working copy of a 18th c. Octant featuring jointed ebony frame. engraved ivory scales, brass, glass and mirror optics.© Wm. R. Robertson
4 points -

From the album: Dolls, Figures & Animals
A little girl with a replica of a costume in the FIDMA in Los Angeles.4 points -

From the album: Needlepoint
Stitched on silk gauze #40 with one thread of hand dyed cotton by The Gentle Art Size : 12 x 18,5 cm or 4" 5/8 x 7" 1/4 189 x 293 stitches The original is in my summer house along with the aunt Olga's and a chinese one not yet finished in miniature4 points -

From the album: Furniture 1
Inlay 25 different woods.4 points -
 4 points
 -

From the album: Furniture upholstered with needlepoint
A needlework stand design called 'Larkspur and Roses' by Janet Granger, stitched on 40 count silk gauze, stitched with one strand of Anchor stranded cotton.© Janet Granger
4 points -

From the album: Furniture 1
Shown in the closed position in the upstairs hall of Twin Manors© Wm. R. Robertson
4 points -

From the album: Accessory & Other Objects
This will be a project taught at Guild School Class 20144 points -

From the album: Furniture 2
Morgan and Sanders library chair, 1815. Built by Debora Beijerbacht.4 points -

From the album: Needlepoint
Herati rug stitched on 40 count silk gauze with French Knots, the chart was designed by Sue Bakker.© Elga Koster
4 points -

From the album: Structures & Rooms
Emily made miniatures for over 40 years, she made EVERYTHING you see, furniture, needlework, metal work, ceramics….. everything!4 points -
4 points
-

From the album: Ceramics
The original tiles on the floor of the chapel ‘The Vyne` in Hampshire, England, probably were made 1520 in Antwerp (Belgium).© Tiny Ceramics
4 points -
Elga, this progression is a shortened version of one I have on another forum. That reference was from about six years ago. If I calculate correctly I am in my 12h or 13th year on this project. It is a very complicated project requiring time to learn and develop methods of producing the parts. As Bill said it sometimes takes more time to develop jigs and fixtures that it dose to make the part from them. Developing the glass beveler took several months of research and trying to build a machine to do it on. While back in Kansas City to teach a study program, Bill took me to a lapidary shop where I found this machine. I bought it and had it shipped back to Oregon then had to figure how to convert it for beveling glass. I had to make it so that the angle could be adjusted to accommodate different sizes of windows. Thank you all for your comments. Following this forum is encouraging me to try to get back at it.4 points
-
This is how I go about making the decorative metal parts such as the sun burst and now the C details, for the popcorn wagon, from nickel silver stock. (1) The parts are drawn up to scale and glued to the metal with spray adhesive. (2) They are then sawn out using a jeweler's saw (I am using a #1 blade here) Use Burr-life or bees wax on the blade for lubrication. (3) The shape is filed to contour. I use files as as I have more control; a power burr can grab and ruin the whole thing. Once it is filed to rough shape I finish shaping using rubber polishing tools in a power hand piece. (5) Once the part is polished to final shape it is buffed to as high shine with compound.4 points
-
PART 3: MAKING THE WHEELS This is the rear wheel of a popcorn wagon that is being restored by Pearson's The thing in the hub is a hub nut wrench, the wheel was being removed at that time. Look closely and you can see the brake hub and brake assembly on the back side of the wheel. The model rear wheel from the back showing the brake drum and working and adjustable brake band assembly.(more about that brakes later) The model wheel.4 points
-

From the album: Accessory & Other Objects
1/12 th scale roller skates, they adjust for length and the the toe clips tighten, all by using the skate key.© Wm. R. Robertson
4 points -

From the album: Ceramics
hand painted underglazed earthenware miniature charger after English Arts and Crafts by William De Morgan 1 13/16"d.© Lee-Ann Chellis Wessel
4 points -

From the album: Ceramics
hand decorated underglazed porcelain miniature charger after Chinese export from 1590-1635© lee-Ann Chellis Wessel
4 points -
4 points
-

From the album: Textiles
4 points -

From the album: Textiles
4 points -
Developing the tires. On the original the tire is made up of six individual sections and nailed on to the wheel. to make it simpler for me I rolled and silver soldered the joint of a main tire. I then made each individual section which I some soldered and riveted in place. Each of the cleats were filled out to look rough. This is the point I am on th is project.

.thumb.jpg.16d7f46d402dafeb5d98a5aeebaf8365.jpg)
.jpg.8998122020400b9c4c7618d57d73edbf.jpg) 3 points
3 points -
My lights are much better with the LEDs added, but I sure can't get a decent photo of the room with the lights on, I tried during the day and in the dark, and if the scene isn't yellowed it's overpowered by the bright light glare. It's not the type of photo I've ever had to take before now, but suffice to say the scene looks much better than before and this photo might indicate. The LED bulbs are behind the walls, the chandelier and table lamp are normal bulbs3 points
-
The Brake System: The brake leaver is constructed from nickel silver flat stock, It works. Could not find a proper spring in scale so it works on a torsion process to operate the latch dog. The correct notches will be fitted in the arc when I finish the brake system. This is one rear wheel with the brake drum out side brake band and mechanism and the bracket that attaches to the rear spring which holds the brake band in place. Note the 1/32' hex nuts inside the brake drum. The brake drum, brake band (it is adjustable by turning the little cylinder under the yoke) and mounting bracket which will clamp on the spring. This is the brake drum and brake band mounted (off the wheel) to the bracket that is attached to the main wagon springs. The complete brake system for the brake leaver side. The short leaver sticking down about mid length is connected to a shaft that runs under the wagon to a similar brake system for the other side.3 points
-

From the album: Ceramics
hand made underglazed earthenware miniature after Italian Renaissance maiolica. 1 7/16" d.© Lee-Ann Chellis Wessel
3 points -

From the album: Accessory & Other Objects
18 K gold over ebony, working lock and mill grained edges on each panel.3 points


.jpg.a1549deceb2f90164add18a095dbdca9.jpg)
.jpg.8998122020400b9c4c7618d57d73edbf.jpg)


